Friday, December 23, 2011

Gift Card Holder

I needed some gift card holders so went to one of my favorite blogs--Dawn's Stamping Thoughts--and found the perfect one. The link above will take you right to the video showing how to make this gift card holder. Why pay $3-$5 for a gift card holder when you can make one this cute?!!!


For this gift card holder I used"

  • Whisper White and Baja Breeze card stock
  • Silver Glimmer Paper
  • Baja Breeze Classic Stampin' Pad
  • Medium envelope
  • Stitched Stocking set
  • Snow Swirled stamp set
  • Stocking Builder Punch
  • Eyelet Border Punch
  • 2 3/8" Scallop Circle Punch
  • 1 3/4" Scallop Circle Punch
  • Round Tab Punch
  • Basic Rhinestones
  • Dimensionals
  • Sticky Strip 


Two pockets inside hold your gift card and a cute card to write a note on. 

I am so excited about this gift card holder and am anxious to make some with different themes. I have a motorcycle stamp I want to use to make a gift card holder for my husband. Will share what I come up with. There is still time to make some before Christmas. Don't have all the supplies I used--improvise!

Have a great weekend and a Merry Christmas with family and friends. Kat

Thursday, December 22, 2011

Tags of Christmas #8

Today's tag is easier than easy but so elegant looking! I made it using leftovers from cards I had made using the Christmas Lodge stamp set. I had so many favorites in the Stampin' Up! Holiday Mini catalog that I will be sorry to see it end at the end of this month:( But I have to say that my very favorites are the Christmas Lodge stamp set and the Frostwood Lodge Designer Series Paper.


For this tag I used:

  • Christmas Lodge stamp set
  • Frostwood Lodge Designer Series Paper
  • Cherry Cobbler, Early Espresso and Whisper White card stock
  • Early Espresso Classic Stampin' Pad
  • Cherry Cobbler Quilted Satin Ribbon
  • Mini Glue Dots (to attach ribbon)
I will be sharing the Gift Card Holder tomorrow and I am hoping to be back later today with pictures of my cookie baking.

Have a great day! Kat


Wednesday, December 21, 2011

Tags of Christmas #7

This tag was fun but a little tricky. Because embossing breaks down the fibers in the paper, you have to be very careful when you roll the ends of the petals (or leaves) around a pencil. A couple of my petals are not as pointy as they should be:( I can't remember where I got the idea for this poinsettia but was on someone's blog. If it was your idea, please let me know so I can give you credit.


For this tag I used:

  • Whisper White, Old Olive and Real Red card stock
  • Come to Bethlehem stamp set (sentiment)
  • Snow Burst embossing folder (used the backside of embossed design)
  • Blossom Builder Punch
  • Basic Pearls
  • Dimensionals
Still baking cookies. Got a full day of cookie baking planned for tomorrow. Hopefully will have pictures for you tomorrow.

I have one more tag to share so come back tomorrow for Tags of Christmas #8! I also have an adorable Gift Card Holder to share--made four of them today!

Thank you for stopping by; I love sharing with you. Please leave a comment to let me know which tag you like the best!  Kat

Tuesday, December 20, 2011

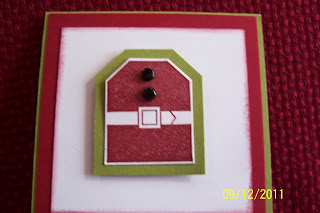
Tags of Christmas #6

This will be a quick post today as I am busy baking cookies--lots of cookies! Will try to get some pictures of the cookies before they are all given away! We used to give cookies to our neighbors at Christmas time but several years ago switched to the little Clementine mandarin oranges and they love them! It's a great gift to give when you don't know if the person is diabetic or not!


Another 3" X 3" card that is super simple--can make lots in no time! For this tag I used:

  • Old Olive, Cherry Cobbler and Whisper White card stock
  • Cherry Cobbler Classic Stampin' Pad
  • Black brads (for buttons)
  • Dimensionals
  • Tags til Christmas stamp set
So, there is still time to make a few super simple tags of your own to wow your family and friends!

Hope you have everything ready so you can enjoy this week with family and friends.  Kat


Monday, December 19, 2011

Tags of Christmas #5

I was so busy today I almost forgot to post Tag # 5! But so glad I remembered in time. 


I got our Christmas boxes and the last of the Christmas cards to the Post Office today plus delivered our last stamping order along with the new Occasions Mini Catalogs (starts January 4) and the Sale-a-bration catalogs (starts January 24)! Whew! 


Oh, by the way, I didn't totally mess up the date on my camera after all! The 09 is the day; 12 is the month! I'll get that straightened out soon.


I did this tag in blue because some of my club members like blue (a lot) so did this one for them but the picture really doesn't do it justice.


For this tag I used:

  • Marina Mist and Whisper White card stock
  • Silver Glimmer Paper
  • Marina Mist Classic Stampin' Pad
  • Stitched Stockings stamp set
  • Stocking Builder Punch
  • Dazzling Details glitter glue
This tag was done as a 3" X 3" card with the To & From on the inside.

Leave a comment to let me know which tag you like the best but don't forget to come back tomorrow for Tags of Christmas #6:)

Have a great day and a super week! Only six more days till Christmas and today is almost over!!! Kat

Friday, December 16, 2011

Tags of Christmas #4

Welcome to Day 4 of my Tags of Christmas! This is another super easy tag that would be easy to make several of fairly quickly. It is a 3" X 3" card (one of my favorites) with the To & From on the inside.


For this tag I used:

  • Whisper White and Old Olive card stock
  • Cherry Cobbler Classic Stampin' Pad
  • Word Play stamp set
  • Designer Buttons--Regals
  • Cherry Cobbler Baker's Twine
  • Mini Glue Dots to attach button
Won't be back with another tag till Sunday so see you then!  Kat


Thursday, December 15, 2011

Tags of Christmas #3

This tag was a real favorite--not only because it's sooo cute, but because it was sooo easy:) What a great combination!!! You could whip a bunch of these out in no time!


Boy! Just noticed the date stamp is two months off on my camera--will need to fix that!


For this tag I used:

  • Whisper White card stock--sponged the edges with Cherry Cobbler Classic Stampin' Pad ink.
  • Silver and Red Glimmer Paper
  • Stocking Builder Punch
  • Cherry Cobbler Baker's Twine
  • Mini Jingle Bell
  • Mini Glue Dots
  • Dimensionals
  • To (& From stamped on the back) stamps from "who knows where?"
  • Hole punched using large punch on my Crop-a-dile

Tuesday, December 13, 2011

Tags of Christmas #2

I wasn't sure the ladies at Stamping Club were going to like this one but they did and so do I. So I guess we will be doing more paper folding next year:)


This tag is a 3" X 3" card with the To & From inside. I used Old Olive and Whisper White card stock; Merry Christmas stamped in Cherry Cobbler Classic Stampin' Pad is from the Come to Bethlehem stamp set. We used leftover Designer Series Paper from last year to make our flower; button from the Regals Collection Designer Buttons; Cherry Cobbler Baker's Twine; spritzed with a spray made from alcohol mixed with a few drops of Champagne Mist Shimmer Paint.


The flower is made doing the Flower Petal Fold that I found at Handcrafted Greetings for FREE:) There are several different paper folding projects both Iris Folding and Tea Bag Folding, which this was.


I hope you enjoyed day two of Tags of Christmas. Come back tomorrow for Day #3!  Kat

Tags of Christmas #1

You get a bonus for the first Tags of Christmas as we made two very similar. For the first tag I used Old Olive, Real Red and Whisper White card stock; Basic Black Classic Stampin' Pad; Real Red Classic Stampin' Pad; Sweets for the Sweet stamp set; Antique Brass 3/16" brad; To & From stamps were from "who knows where?"


The second tag was made using Real Red and Whisper White card stock; Wild Wasabi and Real Red Classic Stampin' Pads; Sweets for the Sweet stamp set and again To & From stamps from "who knows where?" 


These tags were inspired by Becky over at Inking Idaho. I never would have thought of using the Sweets for the Sweet stamp set for Christmas if I hadn't seen what Becky did with this set--sooo cute!


Come back tomorrow for Tags of Christmas #2.  Kat

Monday, December 12, 2011

December Stamping Club

The card was slightly open when I took the picture so it looks like the top of my box is on crooked:( Oh well, you get the idea anyway. 


This card was so quick, easy and fun to make. The Glimmer Papers from Stampin' Up! are sooo much prettier and shinier in person. This card was totally CASED from Jill Olsen! I loved everything about it. On the video she shows you have to color Silver Glimmer Paper so you get just the color you want. For this card it worked out great to use Red and Silver Glimmer Papers. For this card I used:

  • Whisper White card stock
  • Red and Silver Glimmer Papers
  • Blossom Bouquet Triple Layer Punch
  • Hand-Penned Holidays stamp set
  • Cherry Cobbler Classic Stampin' Pad
  • Basic Rhinestones
  • Mini Glue Dots
  • Dimensionals
Christmas Lodge - by Stampin' Up!For Christmas my friend and stamping cohort gave me the Christmas Lodge stamp set. I LOVE it! This is a great old fashioned Christmas set that is destined to become a classic--at least for me! I have seen so many great cards made with this set on other blogs so am excited to get started using it:)

Tomorrow will start my Seven Tags of Christmas. I think there's actually eight but two of them are related so I photographed them together. At Stamping Club last Wednesday we made the card above and eight different tags. Let me tell you, we were busy, busy, busy! But we got them all done and had a great time doing all the projects. Sooo, see you tomorrow with the first of my Seven Tags of Christmas!

Have a great day and a wonderful week. Sure hope it's warmer where you are than it is here--20 degrees! Brrr!  Kat

Thursday, December 8, 2011

Puppy Update

Our sweet little Rocky is now 13 weeks old and such a sweetie. He has definitely been high maintenance but I am happy to report that he slept through the night two nights in a row!  Whoo Hoo!!! I had almost forgotten what a full night's sleep felt like!


We took him to the vet for his 2nd round of puppy shots on November 29 and he had gained 6 pounds in three weeks! So glad it's him and not me!!! I am sure he has gained at least two pounds since then. 


He has so much energy and will go and go until I put him in his crate. Then he immediately falls asleep! Doesn't want to miss a thing!!!


On the third try I was able to get a picture of him looking up at me. Isn't that an adorable face. 


Now, when we get him to tell us he has to go outside to potty and he quits chewing up everything in site, he will truly be the perfect dog.


Have a great day and a wonderful weekend!  Kat

Thursday, November 24, 2011

Happy Thanksgiving!

 Happy Thanksgiving to one and all! We are looking forward to a day with family, friends and good food.


The turkey's safe at our house because we are vegetarians. So what do vegetarians eat for Thanksgiving? Our menu changes a little every year but there are a few things that are "tradition" as my kids call it! This year we are adding a new food to our menu--one I have been wanting to try for some time. When we drive by Hood River we can see the big Tofurky sign from the freeway. Well, this year we bought a Tofurky Vegetarian Feast. I hope it lives up to my hopes, dreams and expectations! 


Our holiday menu will include:

  • Tofurky Vegetarian Feast
  • Kathy's Holiday Dressing
  • Brussels Sprouts
  • Roasted Vegetables (butternut squash, carrots, Yukon Gold potatoes, parsnips, shallots, mushrooms, elephant garlic)
  • Fresh green salad
  • Cranberry sauce
  • Squash rolls
  • Apple Pie and Vegan Pumpkin Pie with Coconut Milk Whipped Topping
I am thankful for each one of you who take the time to visit my blog. You are important to me. Have a great day with those you love. Kat


Tuesday, November 22, 2011

Project #3

Finally, the third project from our November Stamping Club. This card used:

  • Bashful Blue and Marina Mist card stock
  • Glossy paper (don't try to use photo paper as it dries too fast.
  • Come to Bethlehem stamp set
  • Versamark ink pad
  • Black emblossing powder
  • Summer Sun Classic ink pad (for star)
  • Marina Mist and Bashful Blue Classic Ink pads (for brayered background--sooo fun)
  • Basic Rhinestone
It is unusual for me to tear paper for a card because I want to tear it "perfect"! Now, really, is there a perfect way to tear paper?!!! Looking at the picture I am thinking to myself that the bottom of the picture could be torn a little more:(

I want to thank Dawn Griffith for her video at Dawn's Stamping Thoughts  on this card. I had hoped to do it last year but thought I could use Photo paper instead of Glossy paper--wrong!!! So saved it for this year! 

Have a great day and a thankful heart! Kat

Monday, November 21, 2011

Stampin' Up! Online Spectacular!!!

I love a sale and especially when it involves stamping!! Stampin' Up! has two items--the Simply Scored Scoring Tool and the Cookie Press for 20% off until 11:59 pm (MT) today. But there are lots of fun products up to 60% off including fabric!!! So got to www.stampinup.com, click on the "shop now" window and start shopping! Sale items can be combined with nonsale items so be sure to check out the Clearance Rack. Put my name, Kathy Skinner, as your demonstrator to receive preferred pricing. Other than the two 24 hour sale items, the rest of the sale runs through November 30!


Get a little jump on the Black Friday sales! Kat

Friday, November 18, 2011

Can't Believe It's Friday!

I can't believe it's Friday already! And the Friday before Thanksgiving at that!!! Oh, will I ever be ready?!!! I guess ready or not the company will come so hope I have something good to feed them and the house looks presentable. I made 21 more quarts of applesauce yesterday. The non-canners among you may wonder why 21 and the answer to that is 7 quarts fit in a canner so 21 quarts is three canners full. I have one more batch of applesauce to get done and then the project will be finished--even if I do still have more apples:) The batch I just made was using Fuji and Cameo apples. I love combining varieties to see how it tastes. Very yummy indeed! 


The second card we made at stamping club on Wednesday is this very elegant snowflake card. The base of the card is Night of Navy card stock with Baja Breeze layered on top. The stamping was done on Whisper White card stock.


I used the Snow Swirled stamp set stamping the large snowflake in Basic Gray (stamped off once); the medium snowflake stamped in Night of Navy and the small snowflake stamped in Not Quite Navy. The sentiment was stamped in Night of Navy. Basic Rhinestones were used in the centers of the five largest snowflakes. This card is thanks to Candice at Crafting Elegance. I signed up for her Six Weeks of Christmas emails and this was one of them. Candice has a lot of great ideas so I hope you visit her blog.


Well, got lots of housework left to do today in between pottying the new puppy so better get to it. Have a great day and a wonderful weekend! Kat

Thursday, November 17, 2011

Happy Stampers Meet Again!

I LOVE my stamping club and look forward to meeting with these fun ladies every month! Don't mess with my stamping club night:)) This month we made THREE  cards that I will share with you over the next few days. 


This card was totally CASed (copied) from Corrine Summers aka Roxy at Stamping with Roxy. Thanks Roxy! 


For this project I used:

  • Very Vanilla Cardstock
  • Frostwood Lodge dsp
  • Hand Penned stamp set
  • Snowbrust embossing folder for the Big Shot
  • Old Olive Classic Ink Pad
  • Mini Jingle Bells which I attached with Mini Glue Dots
This card is so elegant but quick and easy! And don't you love the Merry Christmas stamp?!!! LOVE IT!!! Also love the Snowburst Embossing Folder and the Frostwood Lodge dsp.  Oh! I might as well admit it...I love all of it!!!

I'll be back tomorrow with another stamping club project.  Kat

Enhanced by Zemanta

Wednesday, November 16, 2011

Birthday Card

Oh my! I had forgotten how good that Carrot Cake recipe is!!! I am sure I used a whole day's Weight Watcher points on that one piece but it was sooo worth it:) My son likes John Deere. He works on a wheat ranch and drives tractors all the time so you would think he would be tired of ole' John Deere but he also has John Deere hats, t-shirts, tins, replicas and other memorabilia. So when I saw the card that Joan Robertson at Joan's Daily Stampede made I had to try it. She has a video to show just how to do it. She has a lot of other fun cards to make as well.


This is my version of Joan's card. It is made of punches--lots of punches! The punches used for this card are:

  • Extra Large Tag Punch
  • 2 3/8" Scallop Circle Punch
  • 1 3/4" Circle Punch
  • 1 1/4" Circle Punch
  • Word Window Punch
  • Photo Corners Punch (retired)
My son was thrilled with his card and I will be showing it off to the ladies at stamping club tonight!

Have a great day! Kat

Tuesday, November 15, 2011

Happy Birthday, Scott!

Today is my son's 39th birthday! Happy Birthday, Scott! For at least the last 30 years he has requested carrot cake made from the same old recipe! I will be giving you that recipe today. 


In addition to the cake I also made a few of his favorite foods for supper. Don't we always celebrate with food?!!! By the looks of my hips I must do a lot of celebrating:))) Non-vegetarians have probably never heard of Loma Linda Tender Bits but vegetarians surely have. I bread them and fry (nasty word) them in a little oil. Then another of his favorites that I rarely make is carrot salad--yum! yum! I rounded out the meal with some hashbrowns I made from the potatoes I baked yesterday.


I have seen a lot of recipes for carrot salad but mine is simple--grated carrots, pineapple chunks, raisins and mayonnaise--simple! If I have mini marshmallows I throw some in but I usually don't have any on hand.


Carrot Cake


2 cups sugar
2 cups flour
1 teaspoon salt
2 teaspoons cinnamon
1 teaspoon baking soda
1 1/2 cups oil
4 eggs
3 cups grated raw carrots
1 cup chopped nuts
Combine ingredients with an electric mixer, adding eggs one at a time. Add nuts and carrots last. Pour into baking pan--oblong, angel food, bunt or 2 layers. Bake in a 350 degree oven for 40 minutes if using a layer pan; bake 1 hour and 20 minutes if using an angel food or bundt pan.


Frosting
3 ounces cream cheese
1/4 cup cream
1 teaspoon vanilla
2 1/2 cups powdered sugar
Blend cream cheese and cream; add vanilla and sugar. Cake may be frosted while warm.


This recipe comes from a cookbook I have had for years called An Apple A Day...Vegetarian Cookery by Doctors' Wives. However, if you are looking for healthy recipes, this is not the cookbook you're looking for--lots of fat and sugar in these recipes but they sure are yummy:) I get this cookbook out for special occasions only!


Enjoy your kids today--the little ones and the big ones!  Kat

Friday, November 11, 2011

Canning Applesauce

Making applesauce with a Victorio Multi-strainer
Yesterday my kitchen was a sticky mess making applesauce. Normally I make applesauce with apples from our very own trees but this year between the coyotes and the porcupines we didn't get very many apples:( The coyotes ate the apples (plums, pears and grapes, too) and the porcupines ate all the rest! So my super shopper hubby went to Andy's Market in College Place, WA where they sell the best tasting apples for the best prices and purchased a bunch of apples--Fuji, Jonagold and Cameo. 


14 of the 21 quarts I canned
I decided to mix the Fuji and Jonagold first so made 21 quarts with this combo. Oh, my! It is delicious! I can't even take the credit for the flavor because it is just the apples--no sugar or sweetener of any kind; just plain apples! Next week I want to try mixing Fuji and Cameo.


I want to share with you one of our very favorite breakfast dishes...


Applesauce Toast


Whole Wheat Toast
Peanut butter or almond butter (sunflower seed butter is good too)
Applesauce (home-canned is best)


Put nut butter on toast then ladle warm applesauce on top. Enjoy! Yummylicious!!! Great for when you're feeding a crowd. Add some fresh fruit and you have a meal fit for a king (or queen)!


Have a great day and a super weekend. Kat


Thursday, November 10, 2011

Holiday Bread Recipe

My friend Heidi makes super delicious sweet breads for the holidays. I always love to taste her creations for they are tasty treats indeed! The recipe she is sharing with us today is called Caramel Apple Bread with Coconut Topping. Just the name sounds yummy!!! Treat your friends with this delicious bread for the holidays!


Caramel Apple Bread with Coconut Topping


3/4 cup granulated sugar
1 large egg
1 cup applesauce
1/2 cup butter
1 Tablespoon vanilla
1/4 cup packed brown sugar
2 cups all purpose flour
2 teaspoons baking powder
1/2 teaspoon baking soda
1/4 teaspoon salt
1/4 teaspoon cinnamon (Heidi always adds extra)
1/4 cup dried coconut

  1. In an 8-10" nonstick frying pan over high heat, shake and tilt 1/2 cup sugar until melted and amber colored (about 4 minutes); be careful not to burn. At once, pour hot caramel into a 12" foil square on a flat surface. When caramel is cool enough to handle, peel off foil. Break caramel into chunks and put in a heavy plastic food bag. With a rolling pin, crush into small pieces.
  2. In a large bowl combine egg, applesauce, 1/4 cup butter, vanilla and brown sugar. With a mixer on medium-high speed, beat until well blended. Stir in flour, baking powder, baking soda, salt and cinnamon; beat just until evenly moistened. Stir in caramel.
  3. Scrape batter into a large buttered loaf pan.
  4. Set pan on a sheet of foil placed on oven rack (to catch drippings). Bake at 350 degrees until bread is firm when pressed in the center--about 40 minutes.
  5. Meanwhile, in a small bowl, mix coconut with remaining 1/4 cup sugar and 1/4 cup butter. When bread is firm to touch, spread mixture evenly over hot loaf. Continue to bake until coconut topping is evenly brown--15-20 minutes. Let bread cool on a rack for about 10 minutes, then invert to release bread. Let cool another 10 minutes.
**NOTE: This tastes just as yummy without the coconut topping. Heidi says it's too sweet with it. This is a special bread she makes ONLY during the holidays!

Thanks for the wonderful recipe, Heidi! We are all looking forward to impressing our friends with this great recipe.

This is definitely baking weather so enjoy!  Kat


Wednesday, November 9, 2011

Meet Rocky, the Rockstar!

Rocky loves to play in the base of my ottoman
Meet my new Granddog, Rochester aka Rocky, the Rockstar, an English Bulldog! My son Scott is the proud new parent of this eight week old bundle of energy! I, as his Gramma, get to be his puppy-sitter during the day while Scott is working and get the pleasure of housebreaking him. Oh what fun! It's been 11 years since I last had to housebreak a puppy!!!


We picked him up at the breeders on Sunday but he is catching on to the routine around here and today started harassing the other dogs and the cats, too! 
Rocky and Beau are becoming fast friends


Beau is happy to finally have something around with as much energy as he has. He really enjoys playing with Rocky.


I am looking forward to a few weeks (months?) down the road when he is housebroke and I can let him have the run of the house.


Have a great day! Kat

Friday, November 4, 2011

Waldorf Salad

This time of year certain recipes call my name--potato soup, bread dressing, anything with cranberries or sweet potatoes and Waldorf Salad. Yesterday I made a beautiful Waldorf Salad, put it in a really pretty Mikasa bowl, took a picture of it and later realized I didn't have the SD card in the camera and it appears the camera is so old that the pictures won't download directly from the camera anymore. Do you think I need to ask Santa for a new camera?!!! So, today you get the recipe but no picture:( My recipe is NOT the low fat version but you can reduce the fat by using low-fat or no-fat mayonnaise and reducing the amount of walnuts used. However, wouldn't that take all the fun out of it!!!


WALDORF SALAD


6 cups chopped apples
1 cup chopped celery
1 cup chopped dates
1 cup coursely chopped walnuts
1/4 cup mayonnaise


Stir all ingredients together and enjoy!!! Quick, easy and oh so yummy!


Have a great fall day.  Kat


Tuesday, October 25, 2011

October Stamping Club

I had my fun NEW products to use at our Happy Stampers Stamping Club this month (see previous post). And I was sooo excited to find a wonderful new blog that shows videos on how to use the Simply Scored Scoring Tool for lots of fun projects. You can make the same things without the Simply Scored Scoring Tool but it is a lot more work...and who likes work?!!! Sooo, if you recently purchased the Simply Scored Scoring Tool and want some fun new projects to try it out on, check out what Connie Stewart is doing at Simply Simple Stamping. The Clear Mount Blocks worked like a dream. The Rock & Roll method we used on the Thanksgiving card would have stained the wood on a wood mount stamp but the Clear Mount Blocks washed up--quick and easy!!!


I have been wanting to make this card for some time! The idea came from Lorri Heiling at Confessions of a Stamping Addict. This link will take you right to the video tutorial for the Coffee Cup Gift Card Holder. Lorri has lots of great ideas so check out her blog.


Card Stock used: Pear Pizzazz, Crumb Cake, Early Espresso, Whisper White and Peach Parfait. Also used Spice Cake Designer Series Paper, Melon Mambo and Early Espresso Classic Ink, Perfect Polka Dots embossing folder, S.W.A.K. stamp, Decorative Label Punch--all Stampin' Up! plus 1/4" brown satin ribbon from who knows where! The inside of the card, right, is perfect for attaching a gift card or you could attach a piece of Whisper White card stock and stamp or print your sentiment. Thanks Lorri and thanks to Roxy for putting the card on her blog with a link to Lorri's:)


With Thanksgiving coming up, it seemed appropriate to do a Thanksgiving card, right? The stamp set for this card was in the Holiday Mini catalog LAST year and I wanted it sooo bad but ya just can't buy everything! But, SURPRISE!!! it showed up in the new Stampin' Up! 2011-2012 Idea Book and Catalog that debuted in July. The set is called Day of Gratitude and I know I will use it for more than just Thanksgiving! This is the card we did the Rock & Roll method on and I couldn't believe how easy it is! The picture makes it look like there is a third layer of the Decorative Label Punch but it is just a shadow. However, after seeing the picture, I just might add an Early Espresso layer.


All supplies are Stampin' Up! unless otherwise stated.
Card Stock used: More Mustard, Old Olive, Cajun Craze and Whisper White
Classic Ink colors used: More Mustard, Old Olive, Cajun Craze and Early Espresso
Also used: Decorative Label Punch and Fiskars Decorative scissors.
We can thank Megan Daves at I Teach Stamping for this card. The link will take you right to the video tutorial.


I am planning THREE projects for next month--there is just so much I want to share!!! We will be using the Snow Swirled stamp set for one project; the Come to Bethlehem stamp set for a second project and for the third project we will be using the Hand-Penned Holidays stamp set along with the Snow Burst Embossing Folder, Frostwood Lodge Designer Series Paper and Mini Jingle Bells. All the supplies for the third project are from the Christmas Mini Catalog. 


Thanks for stopping by! Have a great day and a wonderful week! Kat

Monday, October 17, 2011

Whoo Hoo! Christmas in October!!!

Stampin' Up! Clear-Mount Blocks
Stampin' Up! Clear Block Caddy
I asked my son for the Stampin' Up! Clear Mount Blocks -- all nine of them-- for Christmas; he insisted I order them now. How could I refuse?!!! So today the trusty UPS man delivered my set of Clear Mount Blocks...with the CaddyI took the pictures from the website because I couldn't get decent pictures of everything. 


The bonus  was the NEW Simply Scored Scoring Tool that is in the SU! Holiday Mini Catalog!!! I know I am going to LOVE it! I purchased the Scor-Pal a few years ago for my daughter but never got one for myself. After seeing the Simply Scored Scoring Tool, I'm glad I waited. Very simple--nothing confusing; just grooves every 1/8" and ruled at top and left. I'd better not say too many good things about it or my daughter will want me to trade with her...not going to happen:)))
Stampin' Up! Simply Scored
Scoring Tool


What a GREAT Christmas present plus I get to start using them early for my stamping clubs and all the cards in between! 


One more thing to show you before I go today. One of my Stampers sent this card last week and I think it is sooo cute! Love the background--did she do it with her Cuddlebug? 


Have a great day and a wonderful week! The sun is shining here and it has warmed up to nearly 62 degrees:) Love the sunshine! Enjoy it while you can; I know I will!!! Kat


Thursday, October 13, 2011

Oat Chocolate Chip Cookies

Does Fall make you want to cook and bake? It does that for me! I want to make soup and bake bread, crackers and cookies. A dear friend of mine and her husband bake the best desserts EVER and this recipe comes from them. Maybe I can get her to share some of her great dessert bread recipes with us for the holidays?!!!


Good for You Chocolate Chip Oat Cookies


1 3/4 cups flour
1 teaspoon baking soda
1/2 teaspoon ground cinnamon
1/2 teaspoon salt
1 1/4 cups packed brown sugar
1/2 cup granulated sugar
1/2 cup butter or margarine, softened
1/2 cup unsweetened applesauce
2 large egg whites
1 Tablespoon vanilla
2 1/2 cups rolled oats
1/2 cup chopped nuts
12 oz. chocolate chips
bag of Craisins--dried cranberries (2 cups?)


Preheat oven to 375 degrees. Grease baking sheets (or line them with parchment paper like I do--LOVE parchment paper!!!)


Combine flour, baking soda, cinnamon and salt in a small bowl. Beat brown sugar, granulated sugar, butter and applesauce in large mixer bowl and mix until smooth. Beat in egg whites and vanilla. Gradually beat in flour mixture. Stir in oats, nuts, chocolate chips and Craisins. Drop onto baking sheets.


Bake 9-10 minutes. Cool on baking sheets for two minutes then remove to wire racks.


Now, the hard part...hide these from your family and dole out a few at a time or they will disappear in minutes:)))


I think I will bake these for our church potluck this weekend. My mouth is watering already!


Have a great day and don't eat too many cookies!!!  Kat

Wednesday, September 28, 2011

Weight Loss 101

About two months ago I decided to get serious about losing weight. I need to lose 40 pounds and over the last five years have lost 20 of those pounds over and over again. This time I decided to keep at it till I lose every last pound!!!


I signed up for Weight Watchers Online the beginning of August and started walking the dog--great exercise till it gets cold. I am losing slowly but am losing--10 pounds in two months. Thirty more pounds to go! My clothes are already getting loose and some are ready to go to Goodwill.


I will post before and after pictures when I reach my goal!  If you would like to consider Weight Watchers just click on the link. Until October 15 Weight Watchers Online has free signup when you join for three months at $17.95 per month. What a deal! 


On Monday, Dr. Oz introduced his Transformation Nation Million Dollar You--a plan in partnership with Weight Watchers to encourage weight loss, healthy eating and exercise. You can learn more about the Transformation Nation Million Dollar You by clicking HERE.


You will definitely hear more about my weight loss journey--hopefully more good than bad. Kat


Beauregard!

Okay, a little background here. We adopted a Great Dane dog from the Willamette Great Dane Rescue in Portland about nine years ago. His name was Blue. The couple who had him since he was a puppy had to move into an apartment and couldn't keep him so wanted to place him through the Willamette Great Dane Rescue. I don't know how much you know about Great Danes, but they have a lifespan of 8-9 years. Blue lived to be 11 years old but passed away the middle of July. About two weeks after Blue died, my husband said he needed to call Lynn at Willamette Great Dane Rescue to put our name on their waiting list for another dog. My husband thought it might take a couple of months for Lynn to find the right dog for us. Well...two weeks later we got a call from Lynn telling us there was a 15 month old, male Great Dane in The Dalles who needed a home. So much for a couple of months!!!


My hubby went right over to check out the situation! The dog had (has) issues--fear of men and fear of anyone wearing a hat. He was very attached to his female owner. My husband is very tall so decided to kneel down to let the dog get used to him. The dog circled around behind him and bit him on the upper arm! He is a very beautiful dog and my husband decided he wanted him in spite of the fact that he got bit. However, the dog wouldn't get into the pickup with my husband so he ended up having the owner ride to our house with the dog and then stay for a bit while he got a little more comfortable. The first night neither my husband nor I could get close to him but the next day I was his best friend. The third day we had him my husband still could not pet him or get close to him so I sat on my husband's lap and petted the dog. Then he started petting him and I quit. After that my husband could pet him if he was sitting or lying down. When my husband was standing up he was just too intimidating for the poor thing.


The dog came with the name of Scooby but we changed it to Beau (lady's man) and it fits him perfectly. After two months he is getting over his fear of men although when my husband is gone all day and comes home after dark Beau is spooked by him. He hasn't bit anyone recently. He still thinks I am the best thing since sliced cheese:) He has a lot of energy so we have been walking him three miles in the mornings and a mile and a half most evenings. This has been great for my weight loss but also channels some of that energy. Beau has a funny habit if sitting on the furniture--he just backs up and sits down. It looks so funny as you can see in the picture above. His favorite seats are my husband's chair and a loveseat we have on the deck.


Beau is a great dog and we feel very fortunate to have him. His personality is really starting to blossom. I will be so happy though when he gets secure enough to stop following me from room to room. He is getting a little better about it but still has a ways to go. 


I will keep you posted on our rescue dog experience.


Have a great day!  Kat


Taco Soup

Well, I am a couple of days behind but will try to catch up. Arrived at my daughter's yesterday and plan to stay till next Wednesday. Today we went to the YMCA to exercise after taking my granddaughter to school. Then my daughter dropped me off at the tanning salon where I spent a very relaxing 10 minutes in the tanning bed before walking to my daughter's. Whew! Busy morning.


Today I want to share a very yummy recipe for fall. My family loves soup when the weather starts to cool and the days get shorter. 


Taco Soup


1 lb hamburger (crumbled) or 1 can Worthington Vege-burger
1/2 cup chopped onion
3 cups water
2 (16 oz) cans stewed tomatoes
2 (16 oz) cans kidney beans
1 (16 oz) can tomato sauce
1 envelope taco seasoning mix
Shredded cheddar cheese
Corn chips
sour cream


In large saucepan cook burger and onions in 1 tsp. olive oil till burger is done and onions are tender. Add water, tomatoes, kidney beans, tomato sauce and taco seasoning. Simmer covered 15 minutes.  


Enjoy! Kat